Dear SoftMaker customers:

From time to time, we'd like to use our blog to give you targeted assistance for using SoftMaker Office to help you make the most of our office suite. We'll have a look at some frequently asked questions and go through the solutions step-by-step.

In the first installment of this new blog section, we'll take a look at...

Printing worksheets in PlanMaker

What can you do if a printed worksheet doesn't fit completely onto a page, for instance, or if you just want to print out part of the worksheet and not the whole thing?

Your results when printing out worksheets from PlanMaker essentially depend on three factors: the print range, the scaling mode and the repeating rows.

Print range

When you select the "Print" command in PlanMaker, the complete worksheet is always printed out by default (empty cells excluded).

What do you do if you just want to print out part of the worksheet? Simple, you define a print range. When you do that, only the cells located within the print range are active when you print out the worksheet. Nothing else gets printed.

You can define a custom print range for each worksheet in a spreadsheet file. You can do this really easily by simply highlighting the range you want to print and selecting File | Define print range.
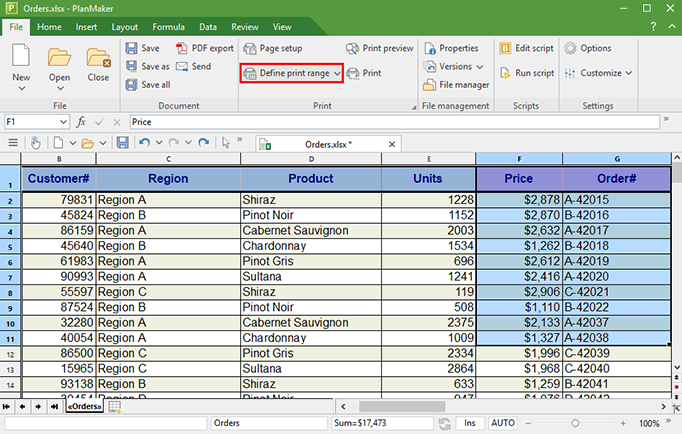
In the above example, only the range between cell F1 and cell G11 would be printed.

Tip: If you selected a print range but then decide that you want to print the whole worksheet after all, you can just tick the "Ignore print range" box in the print dialog window.

Scaling mode

We've all run into this problem: you print out a worksheet, and then you notice that a single column spills over onto a second page. That's not only a waste of paper, but it also breaks up the reader's overview.

The solution: scale the printout. If the worksheet doesn't fit on a piece of paper at full-size, it might fit at 98% or 95%. The minimal difference in font size is nearly imperceptible to the eye.

To specify, how the content of a worksheet should be scaled when printed out, PlanMaker offers you five different scaling modes:

The default setting is a fixed scaling of 100% – that is, the widths of the columns and the height of the rows defined in the worksheet are printed out at a 1:1 scale.

If this results in columns unintentionally being distributed across several pages, it's easy to prevent this. All you have to do is select File | Page Setup | Options | Scaling options "Specify width in pages" and specify exactly one page as the width:

This lets you print worksheets – even sheets with many columns – conveniently and perfectly fitted to the width of a page; the height of the printout (and thus the number of pages) adapts to the number and height of the rows.

You can take a similar approach to printing worksheets with numerous rows on a desired number of pages. Select "Specify height in pages" from the "Scaling mode" drop-down menu.

If you want to make absolutely sure that your table will be printed on exactly one page, you can select the scaling mode "Specify number of pages in total" and enter the value 1 in the "Pages" field.

Please note that the scaling mode will be applied either to the print range or to the entire worksheet, depending on what is specified. Regardless of the selected scaling mode, the minimum zoom level is 20%, while the maximum zoom level is 200%.

Repeated rows and columns

For lists that span several printed pages, column headings can be repeated on each page of the printout. This makes tables easier for readers to follow because they always know which column is which.

You can set up these repeating rows under File | Page Setup | Options, "Repeated rows":

Once set up, the first row of the worksheet will appear at the top of every page:
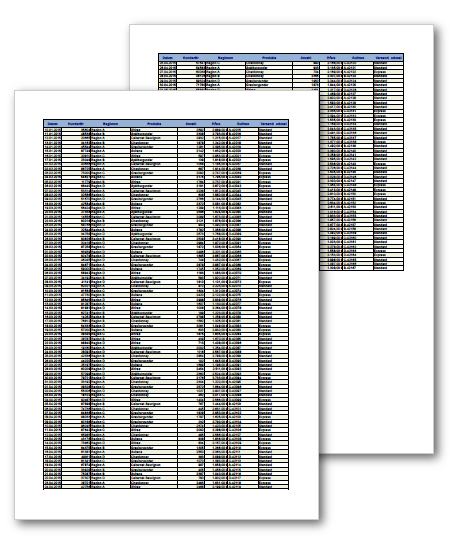
Similarly, for very "wide" worksheets with many columns, columns can be repeated on each page of the printout.

Allowed values are whole numbers or areas defined with a colon. The entry "1:4" in the "Repeated rows" field would repeat rows one to four on every page of the printout.

We hope this article has given you some information you can use. In the comments section below, feel free to suggest other topics for us to address in the future.


Notice: This blog post appeared originally on June 24, 2016 and was updated on October 18, 2021 to include PlanMaker 2021.

Comments

0
Brian Hopwood
5 years ago
HOW do we PRINT greidlines on a spreadsheet please???
0
SoftMaker
5 years ago
To print the gridlines, please go to "File > Page setup", tab "Options". In this dialog box, please set the checkmark next to "Grid" and confirm by clicking "OK".
0
Dick McConnell
5 years ago
Sizing is less problem than knowing the maximum number of possible pages.
After 12 pages, print preview only displays previous pages. To preview, I revert to resorting pages to previous positions to be able to preview. Is there a page limit or is there a page sequencing procedure
0
SoftMaker
5 years ago
Actually, there shouldn't be any page limit. Could you please send us the affected file so we can investigate the issue? Please send us the file using our support form at

http://www.softmaker.com/en/support-assistant
0
Ron Hicks
5 years ago
I am trying to print 2 sections of a report. I enter A1:I60,B233:G281 and get-The defined print range is invalid. Thoughts?
0
SoftMaker
5 years ago
With PlanMaker 2018, you can only define contiguous print ranges (e.g. "=Sheet1!$A$1:$I$60"). Non-contiguous print ranges (e.g. "=Sheet1!$A$1:$I$60;Sheet1!$B$233:$G$281") are not yet supported. However, we will add your suggestion to our whish list for future versions of SoftMaker Office.
0
Alfredo
5 years ago
Excellent! Thank you
0
Lewis Bailey
5 years ago
I have a long thin spreadsheet (4 columns by 150 rows). If printed normally, the output is several pages of narrow printout (only 4 columns across) with most of the page being empty white space.

Can PlanMaker print rows 1 to 50 on the left of a page, then 51 to 100 in the middle and 101 to 150 on the right thus saving two thirds of the paper needed?
0
SoftMaker
5 years ago
Such issues are best discussed with our technical-support team (just contact them using our support form at https://www.softmaker.com/en/support-assistant ).
0
Dave
5 years ago
I have Planmaker 2018 rev 946.0211 on my windows 10 64 bit machine. In a multi sheet spreadsheet, when I select "print preview" it always shown only the preview of one of the several sheets in the file. No matter what sheet is selected via the sheet tabs at the bottom, only that same single sheet is shown in the print preview, thereby making it impossible to print preview any of the other sheets.

Any idea what the problem is here. A bug in the software that you've had reported before perhaps?

Thank you for your help.
0
SoftMaker
5 years ago
To browse the different worksheets in the print preview window, please make sure that the radio button "Whole document" is activated in the "File | Print" dialog. You can also access this dialog from the print preview by clicking on the little printer icon in the toolbar. Please note that you can confirm the settings of this dialog without having to print: the "Cancel" button becomes a "Close" button after changing the mentioned setting. Afterwards, you should be able to browse the different worksheets in the print preview window using the little arrow icons in the upper left corner.
If that doesn't solve your problem, please contact our support team:
https://www.softmaker.com/en/support-assistant
0
Edson
5 years ago
I`m trying to create a data validation, but I could not find this feature on planmaker 2018,
It is possible to create this data validation? or planmaker does not has this feature?
thanks in advance.
0
SoftMaker
5 years ago
PlanMaker 2018 supports input validation. You can find it under "Review | Input validation" (classic interface: "Format > Input validation". Please note however that this feature is not available in SoftMaker FreeOffice.
0
Mobiletech Review
5 years ago
Thank you so much for writing this article and I will surely read all the blogs from now on.
Mobiletech Review
0
Steve Johnson
4 years ago
For MacOS, the scaling options are found in Page Setup -> options
0
Allen Rosenston
4 years ago
In Excel & WPS you can use CTRL+D to copy the above cell into the current cell. Does Softmaker office have an equivalent? Is there a chart that compared the Excel Shortcut Keys to their equivalent in Softmaker?
0
SoftMaker
4 years ago
To duplicate the above cell into the current cell by pressing "Ctrl+D", right-click on the ribbon and go to "Customize ribbon". In the "Customize user interface" dialog box, enter "Duplicate cell above" in the quick search. Then place the cursor below "Press new shortcut key" and press "Ctrl+D". Now you can close the dialog box and use the shortcut as desired.

You can use the very same dialog box to export a complete list of all your shortcuts by clicking the "Export" button in the bottom left corner.
0
Holly
4 years ago
How do I recover files that were written over?
0
SoftMaker
4 years ago
Please send your technical questions on the link below. Our technical support team will be happy to assist you.

Technical support: https://www.softmaker.com/en/support-assistant
0
Howard hheavens262@comcast.net
3 years ago
i have a new 2021 planmaker and i cannot print. when i click print i get a print setup that is over the top of my screen and below the bottom. and no way to bring up the part of the window where it says print
0
SoftMaker
3 years ago
Please send details of your problem, screenshot of the problem and sminfo file on the link below. Our technical support team will be happy to assist you.

Technical support: www.softmaker.com/en/support-assistant
0
john burrows
3 years ago
How do we insert pictures in the Header in Planmaker?
Also, why isn't the header and footer visible at all times?
0
SoftMaker
3 years ago
Thanks for your post. Currently, both these features are not available in PlanMaker, but I have forwarded these requests to our developer team.
0
Marilyn McGarvey
3 years ago
I have a spreadsheet with many rows and columns. In one column I have pasted photos. When I do a print preview everything looks good but when it prints some of the photos are partially in the cell below. How can I correct this?
0
SoftMaker
3 years ago
Please send details of your problem with the file that have the problem, screenshot of the problem and sminfo file on the link below. Our technical support team will be happy to assist you.

Technical support: www.softmaker.com/en/support-assistant
0
jim m
2 years ago
How can I define multiple print ranges ( 2,3 or 4) and print out the 3 o4 4 on the same report
0
SoftMaker
2 years ago
Thanks for your post. Currently, defining multiple print range is not possible, but you can print multiple range by selecting them and then select "Only selected cell" option while printing.
0
Lyn
2 years ago
When I do a print preview I can see exactly what I want printed. The problem occurs when I print, some of the columns are missing.
I have tried all your recommendations, ie fit to 1 page etc, but I must still be doing something wrong.

Please can you advise.
0
SoftMaker
2 years ago
Thanks for your post. Please send details of your problem with the problematic file on the link below. Our technical support team will be happy to assist you.

Technical support: www.softmaker.com/en/support-assistant
0
Lyn
2 years ago
Hi
Forgot to add, that it seems that the scale of the printing is too large.
I am trying to print columns A to U if that is any help.

Thank you
Lyn
0
D. Lewis
2 years ago
Sheet appears standard size - in Landscape format. 5 columns and 102 rows. But when I print, it puts the entire spreadsheet onto one page - too small to read. I want to print in landscape at full-size over several pages. What do I need to select to do this?
0
SoftMaker
2 years ago
Thanks for your post. Please send details of your problem with the problematic file on the link below. Our technical support team will be happy to assist you.

Technical support: www.softmaker.com/en/support-assistant

Add comment

Submit